[JAVA] [Rails] Implement credit card registration / deletion function in PAY.JP
Introduction
We have introduced PAY.JP to make credit card payments with a personal app. There was a slight stumbling block in the introduction, so I have listed it as a memorandum.
Prerequisites
- Rails 5.2.4.2
- Ruby 2.5.1 --Use devise --Use haml --Using VS Code
procedure
- Registration of PAY.JP
- Introduce / prepare PAY.JP to the app
- Create a model
- Migration file
- Creating a controller
- Introduction of gon
- Create JS file
PAY.JP registration
Register from the following URL. PAY.JP

When registration is complete, you will be taken to the screen above. (Because it was used, sales are high.) Initially it is in test mode. In order to make a real transaction, you need to apply and switch to live mode. This time I'm using the test mode because it's for personal apps and not for commercial purposes.
Use the contents of "API" in the menu bar.

I will use this test private key and test public key for my app.
Introducing PAY.JP to the app and preparing
Add the following to Gemfile
gem 'payjp'
From here, we will prepare to create an input form for card information, but there are two ways to do it.
About tokenization of card information
- Check out
- Custom
At checkout
<form action="/pay" method="post">
  <script src="https://checkout.pay.jp/" class="payjp-button" data-key=""></script>
</form>
By describing the above, you can use the form prepared by PAYJP.
This time I wanted to customize the form myself, so I did the following:
Add the following to the head part of application.html.haml.
%script{src: "https://js.pay.jp", type: "text/javascript"}
Officially, in addition to the above, the public key is also described, but I described it separately (described later).
Next, write the PAYJP public key and private key in credentials.yml.enc.
- Use the function called Encrypted Credentials introduced from Rails 5.2 series. This is a function that allows you to simply manage values that should not be disclosed to the outside for security reasons, such as API keys.
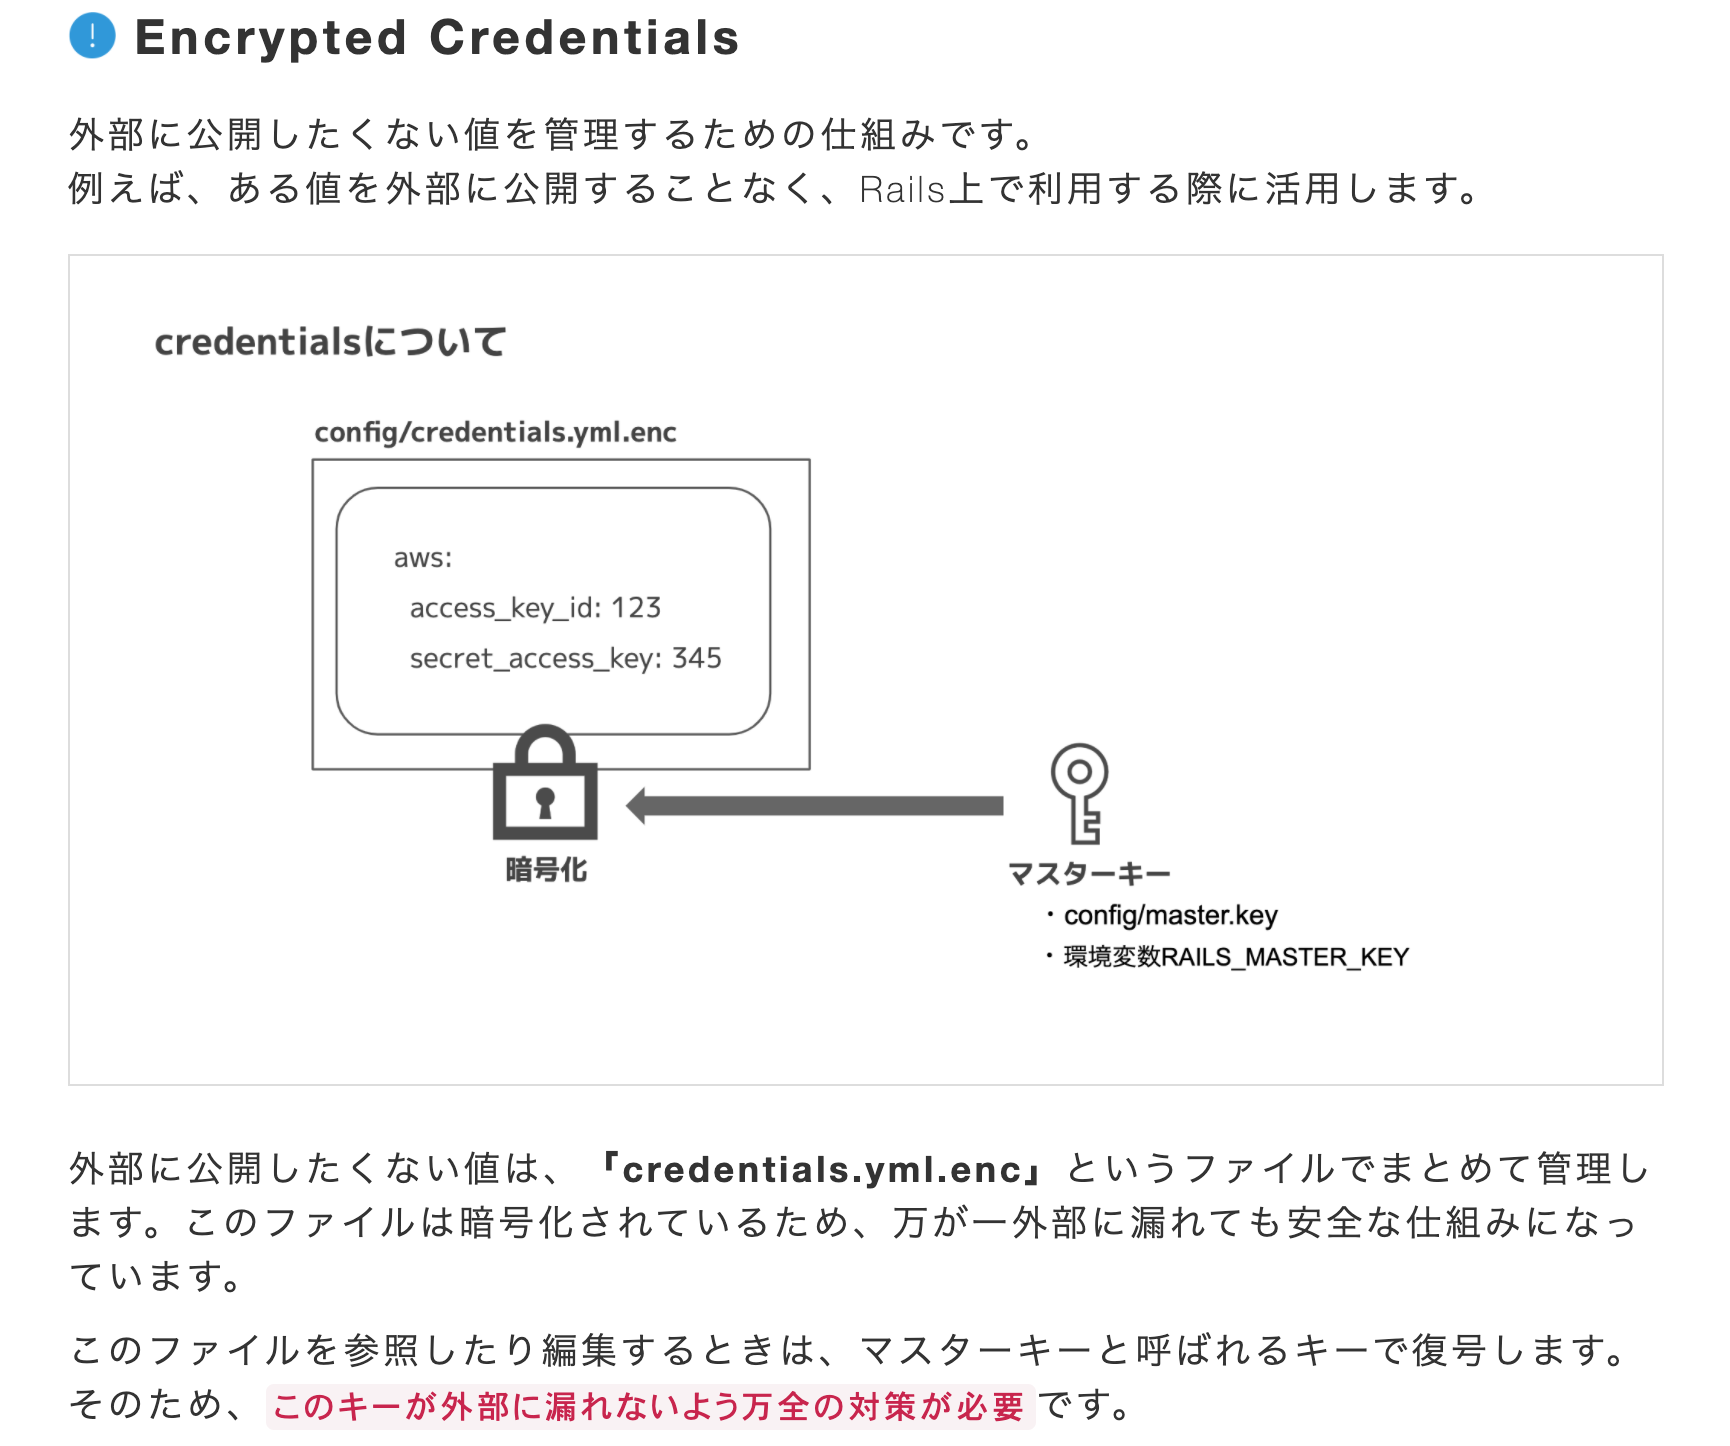
A little preparation is required to edit the file. First, make settings so that VS Code can be started from the terminal. In VSCode, press Command + Shift + P at the same time to open the command palette. Then enter "shell". In the menu, the item "Install'code' command in PATH" is displayed. Click it. By doing this, you can now start VS Code by typing "code" from the terminal.
Next, edit the contents of the file below.
$ pwd
#Make sure you are in your app directory
$ EDITOR='code --wait' rails credentials:edit
After a while, the file will open as shown below.
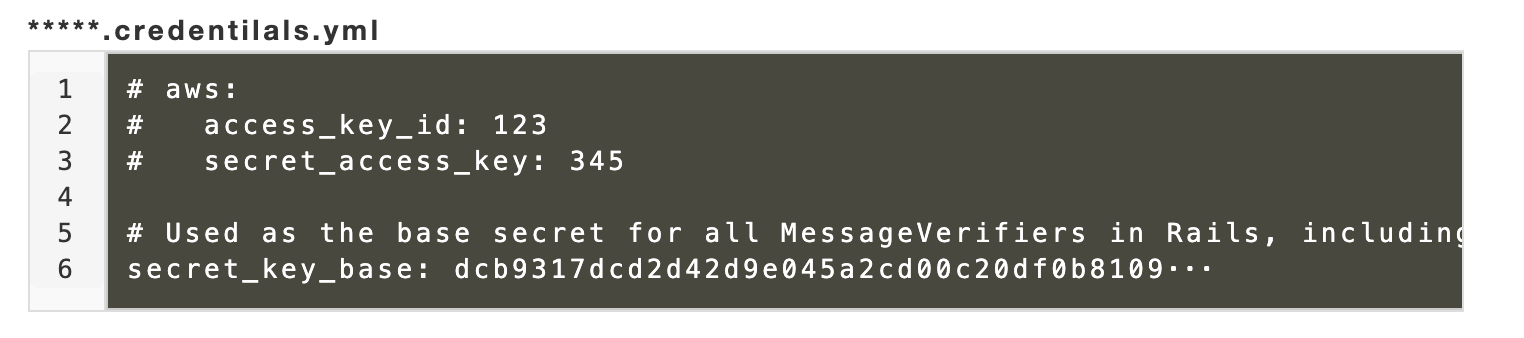
Write here as follows. Notice that it is nested.
payjp:
  PAYJP_SECRET_KEY: sk_test_...
  PAYJP_PUBLIC_KEY: pk_test_...
If you write your own key, save it, and then close the file ”New credentials encrypted and saved.” Is output to the terminal, so it is complete.
You can check if it has been saved with the following command.
$ rails c
$ Rails.application.credentials[:payjp][:PAYJP_SECRET_KEY]
$ Rails.application.credentials[:payjp][:PAYJP_PUBLIC_KEY]
Creating a model
This time we will name it the Card model. I created it as follows.
class Card < ApplicationRecord
  belongs_to :user
  has_one :order, dependent: :nullify

  require 'payjp'
  Payjp.api_key = Rails.application.credentials.dig(:payjp, :PAYJP_SECRET_KEY)

  def self.create_card_to_payjp(params)
    #Create token
    token = Payjp::Token.create({
      card: {
        number:     params['number'],
        cvc:        params['cvc'],
        exp_month:  params['valid_month'],
        exp_year:   params['valid_year']
      }},
      {'X-Payjp-Direct-Token-Generate': 'true'}
    )
    #Create customer information based on the token created above
    Payjp::Customer.create(card: token.id)
  end
Since the EC site was created in the personal application, the association is User and Order.
We are tokenizing the card information here.
Creating a table
I created a table with the following contents.
class CreateCards < ActiveRecord::Migration[5.2]
  def change
    create_table :cards do |t|
      t.string :customer_id, null: false
      t.string :card_id, null: false
      t.references :user, null: false, foreign_key: true
      t.timestamps
    end
  end
end
I didn't know at first, but customer_id and card_id need to be created as columns on the mast. Records are registered in the table as follows.

Creating a controller
This time, I configured the controller with 4 actions as follows.
class CardsController < ApplicationController
  before_action :set_card, only: [:new, :show, :destroy]
  before_action :set_payjpSecretKey, except: :new
  before_action :set_cart
  before_action :set_user

  require "payjp"

  def new
    redirect_to action: :show, id: current_user.id if @card.present?
    @card = Card.new
    gon.payjpPublicKey = Rails.application.credentials[:payjp][:PAYJP_PUBLIC_KEY]
  end

  def create
    render action: :new if params['payjpToken'].blank?
    customer = Payjp::Customer.create(
      card: params['payjpToken']
    )
    @card = Card.new(
      card_id: customer.default_card,
      user_id: current_user.id,
      customer_id: customer.id
    )
    if @card.save
      flash[:notice] = 'Credit card registration is complete'
      redirect_to action: :show, id: current_user.id
    else
      flash[:alert] = 'Credit card registration failed'
      redirect_to action: :new
    end
  end

   def show
    redirect_to action: :new if @card.blank?
    customer = Payjp::Customer.retrieve(@card.customer_id)
    default_card_information = customer.cards.retrieve(@card.card_id)
    @card_info = customer.cards.retrieve(@card.card_id)
    @exp_month = default_card_information.exp_month.to_s
    @exp_year = default_card_information.exp_year.to_s.slice(2,3)
    customer_card = customer.cards.retrieve(@card.card_id)
    @card_brand = customer_card.brand
    case @card_brand
    when "Visa"
      @card_src = "icon_visa.png "
    when "JCB"
      @card_src = "icon_jcb.png "
    when "MasterCard"
      @card_src = "icon_mastercard.png "
    when "American Express"
      @card_src = "icon_amex.png "
    when "Diners Club"
      @card_src = "icon_diners.png "
    when "Discover"
      @card_src = "icon_discover.png "
    end
  end

  def destroy
    customer = Payjp::Customer.retrieve(@card.customer_id)
    @card.destroy
    customer.delete
    flash[:notice] = 'Credit card deleted'
    redirect_to controller: :users, action: :show, id: current_user.id
  end

  private
  def set_card
    @card = Card.where(user_id: current_user.id).first
  end

  def set_payjpSecretKey
    Payjp.api_key = Rails.application.credentials[:payjp][:PAYJP_SECRET_KEY]
  end

  def set_cart
    @cart = current_cart
  end

  def set_user
    @user = current_user
  end
end
In addition, in order to avoid writing the PAYJP public key in a JS file, which will be described later, we have introduced a gem called "gon". It is a recognition to use when you want to use ruby variables in JS files.
Introduction of gon
Add the following to Gemfile
gem 'gon'
Add the following to the head part of application.html.haml.
= include_gon(init: true)
Now you are ready to go.
Creating a JS file
From here, create a JS file that works with new.html.haml, which is called by the controller's new action. First, write new.html.haml.
- Regarding the card number etc. to be entered in the form, please use the one on the official page below. Here is the test card used in the API.
.cardNew
  .title
Credit card information input
  .cardForm
    = form_with model: @card, id: "form" do |f|
      .cardForm__number
        = f.label :card number, class: "cardForm__number__title"
        %span.must_check required
      .cardForm__field
        = f.text_field :card_number, id: "card_number", placeholder: "Half-width numbers only", class: "form-group__input", maxlength: 16
      .cardForm__image
        = image_tag(image_path('cards/icon_visa.png'), class: 'visa', width: 58, height: 28)
        = image_tag(image_path('cards/icon_mastercard.png'), class: 'master', width: 47, height: 36)
        = image_tag(image_path('cards/icon_jcb.png'), class: 'jcb', width: 40, height: 30)
        = image_tag(image_path('cards/icon_amex.png'), class: 'amex', width: 40, height: 30)
        = image_tag(image_path('cards/icon_diners.png'), class: 'diners', width: 45, height: 32)
        = image_tag(image_path('cards/icon_discover.png'), class: 'discover', width: 47, height: 30)
      .cardForm__expirationdate
        .cardForm__expirationdate__details
          = f.label :expiration date
          %span.must_check required
          %br
        .cardForm__expirationdate__choice
          .cardForm__expirationdate__choice__month
            = f.select :expiration_month, options_for_select(["01", "02", "03", "04", "05", "06", "07", "08", "09", "10", "11", "12"]), {}, {id: "exp_month", name: "exp_month", type: "text"}
            = f.label :Month, class: "cardForm__expirationdate__choice__month__label"
          .cardForm__expirationdate__choice__year
            = f.select :expiration_year, options_for_select((2020..2030)), {}, {id: "exp_year", name: "exp_year", type: "text"}
            = f.label :Year, class: "cardForm__expirationdate__choice__year__label"
      .cardForm__securitycode
        .cardForm__securitycode__details
          .cardForm__securitycode__details__title
            = f.label :security code, class: "label"
            %span.must_check required
          .cardForm__securitycode__details__field
            = f.text_field :cvc,  id: "cvc", class: "cvc", placeholder: "Card back 3~4-digit number", maxlength: "4"
          .cardForm__securitycode__details__hatena
            = link_to "What is the number on the back of the card??", "#", class: "cardForm__securitycode__details__hatena__link"
      #card_token
        = f.submit "sign up", id: "token_submit", url: cards_path, method: :post
Next, create a JS file corresponding to the above view file.
$(document).on('turbolinks:load', function() {
  $(function() {
    Payjp.setPublicKey(gon.payjpPublicKey);
    $("#token_submit").on('click', function(e){
      e.preventDefault();
      let card = {
          number: $('#card_number').val(),
          cvc:$('#cvc').val(),
          exp_month: $('#exp_month').val(),
          exp_year: $('#exp_year').val()
      };

      Payjp.createToken(card, function(status, response) {
        if (response.error) {
          $("#token_submit").prop('disabled', false);
          alert("The card information is incorrect.");
        }
        else {
          $("#card_number").removeAttr("name");
          $("#cvc").removeAttr("name");
          $("#exp_month").removeAttr("name");
          $("#exp_year").removeAttr("name");

          let token = response.id;
          $("#form").append(`<input type="hidden" name="payjpToken" value=${token}>`);
          $("#form").get(0).submit();
          alert("Registration has been completed");
        }
      });
    });
  });
});
If you press the register button (= f.submit "submit", id: "token_submit") in the view file, JS will fire. Token creation is done with a method called Payjp.createToken.
With the above, card registration is complete.
Finally, I will briefly describe the delete function. I installed a delete button in show.html.haml that I call with show action as follows.
.payment
  .payment__content
    .payment__content__title
Card information
    .payment__content__box
      .payment__content__box__cardImage
        = image_tag "cards/#{@card_src}", width: 40, height: 28
      .payment__content__box__details
        .payment__content__box__details__cardNumber
          = "card number:**** **** **** " + @card_info.last4
        .payment__content____boxdetails__cardMMYY
          = "expiration date:" + @exp_month + " / " + @exp_year
  .payment__cardDelete
    = button_to "delete", card_path(@card.id), {method: :delete, id: 'charge-form', name: "inputForm", class: "payment__cardDelete__deleteBtn"}
Next time, I will describe the payment function with the registered card.
Recommended Posts